Wardriving at Delhi–Wardriving revisited

The last time I wardrived at Delhi was over 2 years ago, I was at Tulip Telecom then and was doing something of a personal project then. Well, now I am at Orange and thought of replicating the feat, this time I will be publishing the details of networks I wardrived while going to Gurgaon from Delhi. It was done using  combination of G-Mon,Kismet, Moocherhunter  and you just might find it useful. I intent to make a map of Delhi with all the access points , which does sounds incredulous & far fetched, but yep, I intend to do it and I am doing it bit by bit. It helps to analyse in layman terms -
  1. The security awareness of people and organizations
  2. The devices they are using
  3. The security mechanisms they are using.
  4. Wifi range analysis of individual device.
Wardriving at Delhi–Wardriving revisited - theprohack.com , image credits Textually
Well, in all you can find the data from below links -
  1. Hotspot details / BSSID (See if you are on the list) =))
  2. Google Maps KML Data (See it in Google Maps)
If you are interested in contributing to the data, please contact me at admin<at>theprohack.com

Happy Wardriving
- Rishabh Dangwal

BSNL router hacking and possibility of running custom code over it


Hi all,
I am sorry I have been inactive due to my job, i actually got free this weekend and there we go, i was at home. At home I am having BSNL connection, and for those who dont know what BSNL is, its the AT&amp;T of India, bad service , too much blank spots and connections which flap/drop/disconnect like there is no tomorrow. Worst, I was on my android, trying to get the latest of cyanogen nightlies .  I was frustrated by the services of BSNL. Hence I decided to mess with the router itself. 

BSNL router on closer inspection is manufactured by SemIndia and distributed by ITI. It follows the tracks of using firmware of different routers (Broadcom to be specific, BCM6338 stands for Broadcom router firmware version 96338, deployed in US robotics ones and some other popular routers). mine is DNA-A211-1 , one of most popular ones in India.


and then its just configured accordingly wrt ISP. This time, I left the network part, as i do it all the time in my office with Cisco, focused more on the router and firmware itself.


Warning : 
I am not responsible for getting your router trashed, getting wings and trying to kill you. try on your own risk, I am not responsible for your stupidity.


I didn't had a PC (trashed due to burnt ram), so I have to do everything on my android, so pardon for small screen area, understand my plight. T-netted into Router
(PS : screencaps of android may be a bit distorted as shootme app was not working properly over nightly #120)


the first step was to know what was into it, so typed the usual help.


lots of commands :) ran swversion to get the version and see what was this upto. 
With some hunting , i came to know that "sh" command runs over my router , ran it and voila, familiar interface of busybox snaps in.


great..now thats worth something. My android has it too :)) seeing the version made me tick , it was running an older version of busybox. For those who don't know hat busybox is, its a multicall binary. Tried ls, but it didnt worked, hence tried echo *, listed everything :)


bingo..tried cat /etc/passwd and there we go again.


after that, i thought why not to check what other directories have. got into CVS and got information regarding CVS and pserver, noteworthy one is the credentials of pserver


pserver:sunila@192.168.128.19:/home/cvsroot

not much of an interest as they are of a private LAN, googled to find it was configured by Sunil A, employee at SIEMIndia. Again,opened Repository


SemIndia/Engineering/Products/ADSL2Plus/Integ_Source/targets/fs.src

maybe a private repo at SIEM. neverthless..

moved on to /etc


lots of directories here..as a rule of thumb I opened default.cfg


Generic stuff, but what caught my eye was this 

&amp;amp;amp;amp;lt;ppp_conId1 userName="multiplay" password="bXVsdGlwbGF5"

This might come in handy (use your creativity :)) ) . But then I thought that why not to access the router from web interface. I did it.
Went to management and downloaded the backupsettings.conf file, 


opened it and there we go,


I was not able to find the above credentials in it, hence I came to a conclusion that they must be somewhat of higher privilege level.
Moving on..I thought why not to try to create an arbitrary file . Tried
echo ‘rishrockz’ &amp;amp;amp;amp;gt;&amp;amp;amp;amp;gt; rdx

on every directory (I was not able to determine the file permissions as the version of busybox doesn’t has ls or stat ) Finally came to know that /var is writable. Tried creating a file there
echo ‘rishrockz’ &amp;amp;amp;amp;gt;&amp;amp;amp;amp;gt; rdx
file was created : )))))
and then
cat /var/rdx

: ))))
Congrats, you have run/done it :) )
Now I thought why not to upgrade busybox/upgrade firmware/upload scripts over the router, tried tftp

didn’t worked. Then I checked if the tftp daemon was running as a service, it was. yet somehow I was not able to run it. :(

Strange. I thought forget it (small screen keyboard and android research limitation -&amp;amp;amp;amp;gt; frustration) . Well.. next time I will be thinking of going to compile programs (http://people.debian.org/~debacle/cross/ and copying over them using echo (once I get a PC) , I have got some nice ideas and will be deploying them .
In the mean time, for those who are wondering what this machine has, here is the bootup log.

  1. Observation 1 #  - code can be run over the router , but files must be copied using echo (-ne with append option)  or tftp.  Since busybox is there, we can easily insert a kernel module to be run.
  2. Observation 2# -  the webs directory has a lot of html files, maybe manipulated for xss attacks (i didnt covered it as its not my domain, some better guys can do it)
  3. Observation 3# - private CVS credentials of Siemindia pserver. insider attack ? :D kidding. pserver is already much insecure, but since i have seen a lot of organisations using stock/easily guessable passwords for their outer router/firewalls/vpn servers, its not a tough nut to crack.
  4. Observation 4# (most important) - BSNL SUCKS !


Till then .. Stay Gold

-
Rishabh Dangwal


How to Sync Facebook Calendar on Google Calendar & Android

One of the things that have been pesking me since the time I moved on to Android Cyanogenmod 7 was that I was not able to sync Facebook Calendar with Google Calendar or Outlook. Also since I was unable to sync Facebook Calender with Google Calendar hence the I was not able to sync Facebook birthdays on Android . That make me thinking and I got some nifty methods to do the same.

Method 1 (Sync Facebook Birthdays on Google)

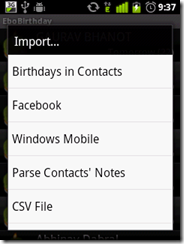
Install Ebobirthday application on Android

Install Ebobirthday

Open it and click on

menu – > Import – > Facebook

menu – > Import – > Facebook

and let it connect to it.

let it connect to it.

Once connected enter your username and password, and allow it to access data. The it will start importing birthdays. Once done, click on

menu –> settings

 click on menu -> settings

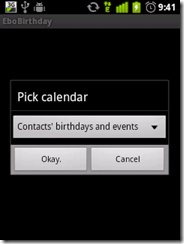
and then choose calendar which you want to update.

choose calendar which you want to update.

choose calendar which you want to update.

then go to

menu –> export –> update calendar

menu –> export –> update calendar

and then it will connect and will update your google calendar :)

jp

Once done, sync your Android and Google. Alternatively you can sync outlook calendar with Google

 sync your Android and Google. Congrats..you have synced Facebook calendar with Google and Outlook !


Congrats..you have synced Facebook calendar with Google and Outlook !

I will discussing the method 2 on my next post :)

Android 2.33 Exploit Android 3.0 & Unrevoked 3.33 may launch soon

Sebastian Krahmer the famed “rage against the cage” exploit dev has released the latest version of exploit that exploits Android 2.3.3 Gingerbread and may also  exploit Android 3.0 Honeycomb and may also exploit Android 2.2 Froyo. As the official post claims -
Free your phone, once again. Successfully tested on Gingerbread (2.3.3) but might also run on Froyo and Honeycomb. If it fails there, some offsets and indexes need to be adjusted which is left to the reader.
NOTE: You use it at your own risk! I am not responsible for any failure or damage. Make sure to read the README file carefully! Download it here. If you successfully run it anywhere, please make a comment with exact device model/firmware running.
 
[Update] I replaced the tarball with a new version to fixsome glitches while parsing vold.fstab. Should now also work on the GalaxyS. Thx to Chainfire.Sebastian Krahmer releases Android 2.33 Exploit Android 3.0 & Unrevoked 3.33 may launch soon
You can download the exploit here .Or you can visit the blog here 
The best part ? Since the exploit is released, we can expect Unrevoked team to release Unrevoked 3.33 soon :)
In the mean time, you can read how to root HTC Wildfire 2.2.1

HTC wildfire 2.2.1 root to HTC wildfire Android 2.3 | Install Android 2.3 on HTC Wildfire | How to root Htc Wildfire 2.2.1

Sometime ago I got an HTC Wildfire and was having loads of fun using it, but every time I wanted to do anything HTC wildfire 2.2.1 root to HTC wildfire Android 2.3 | Install Android 2.3 on HTC Wildfire | How to root Htc Wildfire 2.2.1more  "creative" i was stopped by the binded nature of phone, hence i decided to root it (jailbreak it apple fellas) and get complete control over my device. Here, I am covering step by step guide to root HTC wildfire 2.2.1 and install Android 2.3 on HTC Wildfire.
To do the rooting you must have your Wildfire with S-OFF, HBOOT 1.02.0002 and Android 2.2.1 . You can check it by booting into HBOOT (power on your phone by holding the VOLUME DOWN + POWER button) .This method is strictly for the 2.2.1 owners. How you can turn the S-OFF is your headache, you can try the alpharev (ask the team if they can get you a 2.0 test version... :P) or you can wait for Unrevoked 3.33 or you can straight off go to market and hunt for XTC clip. Either way, try it and don't attempt to anything before you get S-OFF. Actually the notorious S-ON flag is the cause rooting wildfire is such a pain in the a**.
I used to have this

Android 2.2.1

and I converted it into this :)

3

or this =)

7

Anyways, here is how you can root HTC wildfire 2.2.1 and get htc wildfire Android 2.3

What you need ?

  • HTC wildfire with S-OFF , HBOOT 1.01.0002 , OS Froyo 2.2.1
  • USB Drivers (Download)
  • RUU Rom 2.1 / RUU_Buzz_HTC_WWE_1.14.405.2_R_Radio_13.45.55.24_3.35.15.31_release_130814_signed (Download)
  • Unrevoked 3.2 Test version (Download)
  • Cyanogenmod 7 (Download) and Google Apps (Download)
  • Time and Patience & last but not the least,
  • Balls of Steel

    Disclaimer

    I am not responsible if your phone gets bricked, by following the process you are voiding your warranty and significant damage may be caused to your device.
    Its all for educational purposes only, if you are dumb enough to screw somewhere then I will be the one who will be laughing at you.
    Software are unpredictable in nature, one may/may not act as predicted especially in case of rooting (personal experience). Hence my friend, tread carefully.
    in short,

I AM NOT RESPONSIBLE FOR YOUR STUPIDITY.

Step 1 - Installing the USB drivers

Download USB drivers and extract them on desktop. Turn off your wildfire and boot into HBOOT by holding the VOLUME DOWN + POWER button. Connect your phone to your PC and it will show "drivers installing" or similar there for Android device. When prompted , install the drivers by going to device manager and browsing to the folder where you extracted the drivers. Once installed, disconnect and reboot your phone normally.

Now you need to install the Android bootloader interface. Connect it to your HTC wildfire to the PC and it will ask for drivers again, now go to device manager, click on unknown device,

click on update driver -> install from specific location -> No i will choose to install -> choose Android phone and click on adb interface -> click next -> when asked to install click on continue anyway, just install them.

Once done you will see your phone recognized as "Android bootloader interface". Now disconnect your phone and go into

settings -> applications - > development - > enable USB Debugging.

Congratulations, the first step is complete.

Step 2 - Downgrading from Android 2.2.1 Froyo to Android 2.1 Eclair

Download the RUU rom which is an original stock rom. Plug your phone into the PC and set it to "Charge through USB". Double click RUU rom .exe. Follow the on screen instructions and then let it install. Your phone will reboot into stock HTC 2.1 :) This will be the last time you will be seeing it though.

rom

The HBOOT version will be now 0.80.0002 (check it by powering on your phone by holding the VOLUME DOWN + POWER button)  Once done disconnect your phone.

Step 3 - Gaining root using UnrEVOked , get clockworkmod and set your phone free :)

Download the test version of unrevoked. Let me repeat, DO NOT USE UNREVOKED 3.32 as it will lead to CID errors or to be precise this error

"validation error backup cid is missing"

This may be caused as the 3.32 doesnot support HBOOT 0.82.0002. Hence You need specific test version of Unrevoked 3.2 to do the job. Download it, save it on desktop, and run it. Now connect your phone and the rooting will start. Once donw, you will have Clockworkmod recovery installed on your phone. Reboot your phone now (using the VOLUME UP/DOWN key for navigation and clicking using TRACKBALL, the POWER button takes you back in menus). Once rebooted, you will see the superuserapp in your phone and congratulations, your phone is successfully rooted :)

Step 4 - Installing Cyanogenmod 7 or Android Gingerbread 2.3.3

Download the Cyanogenmod 7 with google apps and save it on desktop, connect your phone as USB diskdrive and transfer both zip files on SD card. Once done, reboot your phone into ClockworkMod Recovery (booting by holding the VOLUME DOWN + POWER button and clicking on recovery)

Once the device boots into the ClockworkMod Recovery, use the side VOLUME buttons to move around, and either the POWER button or the TRACKBALL to select.

  • Select the option to Wipe data/factory reset.
  • Then select the option to Wipe cache partition.
  • Select Install zip from sdcard.
  • Select Choose zip from sdcard.
  • choose update-cm-7.0.0-buzz-signed.zip & Let it install.
  • Once done, Select Install zip from sdcard.
  • Select Choose zip from sdcard, choose gapps-gb-20110307-signed.zip
  • Once the installation has finished, to get back to the main menu by clicking the POWER button and select the Reboot system now option.

Congrats..The HTC Wildfire should now boot into CyanogenMod.

Finally rooted :)

Android terminal emulator running on superuser privileges

Enjoy Android 2.3.3 :)

Special thanks to 3xeno 

greetz fly to Singla | Parul | Nilesh | Satwik Bhai | Broken Angel | Rahul Bhai