How I got myself a capable laptop

It all started with my old (and very hated) HP Pavilion notebook (i5, 12 GB RAM, 500 GB HDD) almost dying on me. I wanted to get a new laptop, the only reason I stuck with HP for so many years was that I got it as a gift and I wanted to squeeze every drop of use I could get from it.

Well, let's get a new one then, and I wrote down what I needed -

Must have

  1. Good, tactile, backlit keyboard
  2. HDMI, not micro HDMI
  3. Screen less than 13 inches
  4. Good battery life

 Should have

  1. i5-i7 would do, AMD Ryzen as well
  2. Should be portable
  3. Easy to open, repair and upgrade
  4. USB 3.0
  5. RAM 8 GB or more
  6. 256 GB SSD or more

 Nice to have

  1. Should support extra battery
  2. SIM card slot
  3. Swivel support
  4. Graphics card
  5. MIL-STD-810G
  6. Fingerprint sensor for easy login

My options were quite limited considering what I needed would be automatically expensive - I was looking at spending at least INR 75000-100000 (USD ~1000-1300) to get a new one. That too a base model. 

I didn't mind buying a used one, if it served my purpose and was in good condition. I reached out to my connects in hardware segment and asked for their advice. 

A used Ferrari is always a Ferrari, a new ALTO will never match it.

Point well noted.

They referred me to leased laptop distributors, which typically have inventories of laptops which are leased to corporate for 2-3 years and then brought back once the contract is over. Since they are used, people are less inclined to buy them, but their configurations are top notch as compared to their retail consumer segment counterparts and they are built to repair. These laptops are then dismantled and their parts flood the after sales market. The distributors are more than happy if their laptops are sold before they are dismantled.

After having friendly chitchat with a lot of distributors, I finally narrowed my options to Lenovo X250 and an HP EliteBook. The keyboards were nice and tactile and the form factor was small. At one of the distributors, from a heap of laptops, I picked 2 and I asked the person if I can open it. He said why not, and he opened it for me. Both were in good condition, sporting 256 GB SSDs, 8 GB RAM, i5 5th gen processors and were costing INR 14000 (~USD 190), a far cry from new ones, but workable configuration. I asked about warranty and after a bit of negotiation, he agreed for a 1-year repair warranty for INR 2500 (~USD 34). Windows 10 pro was provided for free.

I was about to settle it for X250 one (as it had more ports, was smaller and checked almost everything I needed), one of associates waltzed in and said, "we just got a shipment of some new stock". I asked if I could take a look and they pointed me to next door.

From a heap of X260s I picked 3 - one with no battery and i7 6gen, one with an extra 6 cell battery with i5 6gen and one had 1 TB HDD. I asked if I could swap parts, and they said we don’t care, it’s all the same for us.

I took the extra battery and plugged it into i7 one. CPUZ said it had Skylake i7 6600u and Samsung 8 GB built in. It had 256 GB SSD and a working WWAN module (SIM module) as well. Single memory slot (DDR4, 260 pin SODIMM) but was easy to open and clean. After playing it with for 1 hour, post testing all the ports, modules, running some stress tests, and haggling a bit, I went home with a deal at INR 17000 (~USD 230) with 1-year warranty from distributor, Windows 10 pro bundled.

Then I did some research and checked the maximum RAM it supported - 16GB, 2133MHz DDR4, non-parity. Probably, enough for what I do. 2133 MHz is a bit hard to get by, so a better option was to buy 2666 MHz one since it will run automatically at 2133 Mhz. I did some research (read: going through Reddit threads, Lenovo forums) and found that one user was able to successfully upgrade it with 32 GB of RAM (M471A4G43MB1, costs around INR 27000/ ~USD 370 even more expensive than the laptop). Post upgrading to latest BIOS, I decided to take the risk and got myself a cheaper one (ADATA AD4S2666732G19, 32 GB RAM, 2666 MHz, INR 9000/ ~USD 122) from one of the distributors.

Went back home, disabled internal battery from BIOS, unscrewed & pried back cover and disconnected battery cable. Swapped out 8GB one with 32 GB one. Connected battery cable, power cable and was met with POST screen. Assembled everything back again and ran memtest86 and windows memory diagnostics. Everything was squeaky clean :). Hardened everything, installed virtual box, migrated my VMs, installed emulators and voila, my new system is ready.

I have been using X260 since last 6 months as my primary laptop with the following configuration which runs multiple VMs simultaneously, is used for maintaining remote infrastructure, occasional retro gaming/ emulation and occasional writing :  


  1. Tactile backlit keyboard
  2. 6th Gen Intel Core i7-6600U Processor, Turbo Boost 2.0 (3.4GHz)
  3. 32 GB memory (ADATA AD4S2666732G19)
  4. 12.5" HD (1366 x 768) IPS
  5. 256 GB Samsung SSD
  6. 3 Cell internal + 6 cell external battery
  7. SIM card slot (WWAN)
  8. 3 USB 3.0 ports (Superspeed)
  9. 1 HDMI/ 1 Mini DisplayPort
  10. 4-in-1 Card Reader (MMC, SD, SDHC, SDXC)
  11. Intel I219 Gigabit LAN & Dual Band Wireless-AC 8260, with Bluetooth® 4.1
  12. MIL-STD-810G compliant
  13. Weighs around 1.5 KG
  14. Bundled Windows 10 Pro

Total Cost - INR 26000 / ~USD 352

Lessons learnt –

  1. Research, hunt and haggle
  2. Be very specific about your requirements
  3. Technology evolves every day, see what fits your needs on a long-term basis

How I turned my phone into a hacking machine

There are probably hundreds (if not thousands) of tutorials on this, but since I wanted a portable, non rooted, disposable hacking device which has the ability to take calls (a.k.a a cellphone/smartphone), I decided to mod an android based device. I have done this earlier (probably 5 years back) by installing arch on my android phone on a separate partition and booting it. This can be done today as well but since I do not want to root my cellphone, and do not want to use proot/LibSDL, I decided to see what can be done in a non rooted environment.

Intended audience for this piece - anyone having a bit hands experience on linux. Consider this as my personal cliffnotes in case I have to do it again. Let me even include an age old Disclaimer (taken from XDA aeons ago):
I am not responsible for bricked devices, dead SD cards, thermonuclear war, or you getting fired because the alarm app failed. Please do some research before running commands. YOU are choosing to make these modifications, and if you point your finger at me for messing up your device, I will laugh at you.
My iPhone recently went kaput during a fated trip to Jubail, KSA, and I zeroed on an inexpensive, capable device (Motorola G4 Play for around ~120 USD) for which I won't feel bad in case it gets lost or breaks into a million pieces.

Well, the device specs are average, the phone feels rugged and the battery can be taken out by simply removing the cover (which is EXTREMELY important for me). It comes with Android 6.0 and probably will never get updated to Android 7.0 (owing to Lenovo's shitty firmware update cadence), but once I disabled a lot of applications, the phone feels quick and is a joy to use.

First things first -
Disabled : Chrome, Cloud Print, Device Help, Drive, File Manager, FM Radio, Google Japanese/Korean/Pinyin/Zhuyin Input, Google Play Movies, Google Play Music, Google Hangouts, Messenger, Photos, other motorola bloatware.

Doublecheck device administrators. I would have removed a lot more software but then, I will also be using this phone for making calls and for light personal use as well.

Installed : Firefox (with Ublock), ESFile Explorer, Termux, Hacker's Keyboard, Textra (for SMS), Quickpic, OpenVPN, SMS Backup+, FastHub (or Github), Fing (quick GUI based network discovery), Flud (Torrents), Google Authenticator, AndFTP, drozer agent, Packet Capture (Application specific packet capture), TOR and Phonograph (lightweight music application).

Once the device's innards are replaced with a bit more capable/lightweight software, I launched Termux which is probably the most important terminal emulator written for android. From its website
"Termux is an Android terminal emulator and Linux environment app that works directly with no rooting or setup required. A minimal base system is installed automatically; Additional packages are available using the APT package manager. "
Onwards we go.
  • I started by updating Termux and its inherent environment - apt update && apt upgrade
  • Installed python2, python3, nmap, openssh, git, python-pip,htop through relevant apt commands.
  • Installed metasploit through https://github.com/Auxilus/Auxilus.github.io/blob/master/metasploit.sh (turns out this script has been stolen by a lot of folks, like this guy over here, and this one for youtube likes).
  • Installed scapy.
  • Generated OpenSSH keys, configured OpenSSH to run into server mode so that I can login into my cellphone if required. Make sure you check the username with whoami before generating keys. Putty aficionados may want to convert id_rsa keys using puttygen before loading it.

  • Configured OpenVPN application to connect to my remote server. Added TOR support.
  • Authenticated Fasthub Application with my Github account through a personal access token.
  • Tested everything.
  • Generated a list of packages for later use by running the following command "dpkg --get-selections | cut -f1 > bkup_pack.txt". 
  • Took tar backup of current Termux installation for later use, I admit it is a quick and dirty hack but it works. Yes, I tested it.
cd /data/data/com.termux/files
tar -cvzf /sdcard/Download/termux.tgz --owner=0 --group=0 home usr
For more adventurous souls, you can go ahead with a rootfs option - https://github.com/xeffyr/Termux-RootFS. A simple tutorial for this would be here, however during my experiments, I found it to be buggy and some applications do not work properly. Since I value stability and security over everything, I promptly reverted back to my old fs.

Does everything works? Hell yeah.

Turn your phone into a hacking machine - Device statistics


Turn your phone into a hacking machine - Metasploit and python HTTP server


Turn your phone into a hacking machine - Running scapy

Turn your phone into a hacking machine - access github


To do : 
  1. Something about postgre stability, the sucker generally has connection issues.
  2. Improve documentation
  3. Harden device (CIS/STIG)

Guide to Anti-Debugging - Overview , Techniques and Approaches

Guide to Anti-Debugging - Overview , Techniques and ApproachesI have been nagged a lot regarding guest posts, and almost 90% of them are related to some news, social media bullshit and half baked security crescendo. Until recently, I was contacted by amiable folks at Infosec Institute with a good article on Anti Debugging. This is an article by  Dejan Lukan, a security researcher at Infosec Institute, in which he discusses the Anti Debugging techniques in an objective and direct manner. I loved the implementation part, reminded me of my rev days (you can learn about how to reverse Winrar or just have a look at a real noobs guide to reverse some more stuff) , and more importantly Dejan explains how to stop (read : slow down) people from reversing your code. Hope you will enjoy it.

Before we begin, we must mention that it’s impossible to completely prevent reversing. What is possible is that we can place as many obstacles on the way as we want to make the process slow enough that reverse engineers will give up. Actually there are hardware implementations where you can buy a black box that attaches to your computer which can do the encryption/decryption for you, but this is far from being used in everyday life.
Techniques to Harden Reverse Engineering

The most basic approaches to harden the reverse engineering of programs are the following [1]:
  1.          Eliminating Symbolic Information
  2.          Obfuscating the Program
  3.          Embedding Antidebugger Code
When eliminating symbolic information, we’re taking the textual information from the program, which means we’re striping all symbolic information from the program executable. In bytecode programs, the executable often contains large amounts of internal symbolic information such as class names, class member names, the names of instantiated global objects. By removing every symbol from the executable or by renaming every symbol, the reverser is faced with a bigger problem than usual because symbol names alone can often be used to gather enough information about what the function does, which simplifies the reverse engineering part.
This can easily be done in C/C++ programs where we only have to append a few compiler flags to the command line that actually compiles the program into the executable. It’s much harder with programming languages like Java and .NET, where those symbols are used internally to reference variables, functions, etc. This is also the reason why Java and .NET programs can easily be converted into a pretty good source code of the original program. We can still strip the symbols from such programs by renaming all the symbols from their meaningful names into meaningless representations, which effectively does the job.
Besides stripping the executable symbols, we can also obfuscate the program. When obfuscating a program, we’re basically changing the code of the program without actually changing the logic behind it, so the program does the same as before but its code is far less readable. Here we have two techniques that can achieve that:
  •  Encoding: With encoding, we must add the decoding instructions that decode the whole program before it’s being run. This can be done by appending the decoding instruction at the end of the program and changing the entry point to point to the decoding instructions. When the program is run, the decoding instructions are executed first, which decodes the whole program into its original form. After that, we must jump to the start of the program and actually run the original instructions as if the encoding didn’t even happen.
  • Packing: When packing the executable, we’re basically reducing the size of the executable as well as encrypting it. When such a program is run, it must first be decoded in memory and then run.
  • By obfuscating the program with nonstandard encoders/packers, we can greatly complicate the task of reverse engineering the executable, but at the end, a persistent reverse engineer will nevertheless be able to bypass that and get the non-obfuscated version of the executable, which can easily be reversed.
Last but not least, we can use an antidebugger code, where we can include a code into the executable that can detect if the program is currently being debugged. If that happens, the program terminates itself prematurely without actually executing the functions that would normally be executed if it wasn’t running under a debugger.
Antidebugging

Before discussing how anti-debugging tricks do their magic, we must first talk about how the debugger is able to debug the program. We know that we can stop and resume the program with the use of either software or hardware breakpoints.
When using software breakpoints, we’re replacing the instruction on which we’ve set the breakpoint with the INT 3 instruction (at least on the x86 architecture), which is a special software interrupt. In this case, we’re passing the value 3 to the instruction INT, which means that we’re generating the software interrupt 3. This causes the function pointed to by the 3rd vector in the interrupt address table (IAT) to be executed. I guess we’re all familiar with the INT 80 interrupt that makes a system call on Linux systems.
The INT 3 instruction temporarily replaces the current instruction in a running program. This is also a way for the debugger to know that a software breakpoint has occurred and the program execution should be stopped. After that, the debugger replaces the INT 3 instruction with the original instruction so the program can continue without the loss of instructions, which can otherwise cause abnormal program behavior.
When we use a hardware breakpoint, it’s the processor’s job to know when the breakpoint has been hit and the program has to be stopped. This is why the program is not modified when a hardware breakpoint is set.
When the breakpoint is hit, the program is stopped and we can safely execute instructions in our favorite debugger. At that point, we can run instructions step-by-step by entering into functions, or by executing them the same time. If we’re interested in what the function does, we need to enter into the function; otherwise we can safely ignore the function and step over it. When stepping through the code, each instruction is executed on its own and then the program is again stopped, so we’re able to analyze what the instruction has just done.

When stepping through the code with a debugger, the Trap Flag (TF) in the EFLAGS register is used. When the TF is enabled, an interrupt will be generated after every executed instruction, so we get the feeling of stepping though the program instruction by instruction.

IsDebuggerPresent

The IsDebuggerPresent is a Windows API function, which we can see on the picture below:
Guide to Anti-Debugging - Overview , Techniques and Approaches

The function doesn’t take any arguments and returns a Boolean value notifying us whether the program is running under a debugger or not. This function can be used to trivially detect whether a debugger is being used to run the program. The function uses the Process Environment Block (PEB) to get information about whether the user-mode debugger is used.
Let’s create a simple program that prints the number 0 or 1 if the debugger is present or not. We can do that by first creating an empty console project under Visual Studio C++ and then changing the code of the main cpp file into the following:
1
2
3
4
5
6
7
8
9
10
11
12
13
14
15
16
17
18
19
20
21
22
23
24
// isdebuggerpresent.cpp : Defines the entry point for the console application.
//

#include "stdafx.h"
#include <stdio.h>
#include <Windows.h>

int _tmain(int argc, _TCHAR* argv[])
{
    int num;
    if(IsDebuggerPresent()) {
        num = 0;
    }
    else {
        num = 1;
    }

    printf("Number: %d\n", num);

    /* wait */
    getchar();

    return 0;
}

The program prints “Number: 0″ if the debugger is present and “Number: 1″ if the debugger is not. If we run the application under Visual Studio, the program will display the number 0 because it’s being run under a debugger. This can be seen on the picture below:
Guide to Anti-Debugging - Overview , Techniques and Approaches

Let’s also run the program under OllyDbg to be sure that the number 0 is displayed. This can be quickly confirmed by loading the executable program and running it. On the picture below, we can see that the number 0 was printed when the program was run under OllyDbg debugger:

But if we run the same program under normal cmd.exe, it will display the number 1. This can be seen on the picture below:
Guide to Anti-Debugging - Overview , Techniques and Approaches

We can see that the IsDebuggerPresent API function call works as expected, but that the function call is easy to detect and bypass. This is because we can quickly find this function call in the executable and delete it or bypass it. To do this, we can simply open the executable in Ida debugger and check out the Imports table to verify if that function exists somewhere in there. We’re right, the function IsDebuggerPresent is listed among all the imported functions as we can see on the picture below:
Guide to Anti-Debugging - Overview , Techniques and Approaches

This is a clear indication that the executable is using the function to do something different when the debugger is attached to the executable. We can also locate the exact instructions that are used to call that function. The whole Ida graph of the main function that does exactly the same as the main function from the C++ source code above is presented on the picture below:
Guide to Anti-Debugging - Overview , Techniques and Approaches

We can see that, at first, we’re initializing the stack for the function and calling the IsDebuggerPresent function. After that, we’re testing the returned value in eax against itself to determine whether a true or false value was returned. If the eax holds a value different than 0 (1 in our case), then the zero flag will be set and the first box that sets the [ebp+num] to 0 is called. This is exactly what happens now, because we’re running the program under a debugger, but otherwise the block that sets the [ebp+num] to 1 is called. After that, we’re just moving the value of [ebp+num] into the register eax and printing it with the printf function.
If we now set the breakpoint on the call to the IsDebuggerPresent function and rerun the program, the execution will be stopped right where we want it. After the breakpoint has been hit, we can step into the function to see what the function actually does. On the picture below, we can see the function in question:
Guide to Anti-Debugging - Overview , Techniques and Approaches

We can see that the function is pretty simple: we’re loading the address of the currently active thread (TIB) in the register eax and then accessing the structure member that’s located at the 0×30 offset; the PEB data structures lies at that offset. After that, we’re loading the address of PEB in eax and then accessing its data member at 0×2 offset, which holds the data member named BeingDebugged. Thus, we’ve successfully taken a look at what the IsDebuggerPresent function actually does and how it does it. We can see that it’s very simple and not really hard to bypass.

We can determine that IsDebuggerPresent is being used when we try to reverse engineer an executable and the program terminates prematurely, a different execution path is taken, or something else unexpected happens. In such cases, we must first check the Imports table if the IsDebuggerPresent function is being called anywhere in the executable. If that is the case, we can simply delete the instructions that call the IsDebuggerPresent function call, so it won’t bother us when reversing the executable.
On the other hand, if we’re developing a program and we would like to use the IsDebuggerPresent function call, we can copy the above instructions directly into our code, so that we’re not actually calling the IsDebuggerPresent function directly, but using its function body instructions to figure out whether the debugger is being used to run the executable. This is just another trick so that reverse engineers won’t immediately notice the use of IsDebuggerPresent function call and will make the debugging slightly more complicated.
Conclusion

For a deeper understanding of reverse engineering, check out the reverse engineeringtraining course offered by the InfoSec Institute. In this article we’ve seen a few techniques to harden the reverse engineering process. The technique easiest to bypass is symbol elimination where we have to delete all the symbols presented in the executable. This effectively makes the names of the functions unavailable when debugging, which leaves it up to the debugger to properly name the functions. Another technique is program obfuscation, which can be a pretty simple operation like xoring the whole executable then running it, but it can also be pretty complicated. Things get further complicated if we’re using obfuscation with the anti-reversing techniques, which detects if the program is being reversed and terminates the program prematurely if so, greatly hardening the reverse engineering of the executable.
References:
[1]: Reversing: Secrets of Reverse Engineering, Eldad Eilam.

Ultimate Guide to run ASA 8.4 on GNS3 on Ubuntu - No more Qemu errors

Simulating CISCO ASA 8.4 on GNS3, on Ubuntu is a pain in the ass. Countless QEMU errors ,203 errors, results with no output on console and many more hair-pulling skull bashing events that *will* make you scratch your head and you will be motivated to buy an ASA for your personal use.
Yes folks..You will be running this..or a cousin of it.
But fear not weary travelers if you have reached at this point of web while surfing (read:hunting) for your share of ASA & firewall stuff, you are right at home. Today I will be providing a step by step almost error free guide of simulating ASA, and fret not, this has been tested on more than 5 platforms with zero error rate (and that included machines of different platform - i386,x86_64; and different flavors of Fedora/Ubuntu).

NOTE: I love linux but I hate Ubuntu, for my own personal reasons. I am a fedora guy & I love debian, but I hate Ubuntu.
Why I didnt covered this guide for Fedora  as Fedora guys will figure out how to do it anyways :P , its Ubuntu ones who were facing maximum issues (just google it) and hence I wanted to cover a guide for it. Jokes aside, I intend to cover the subjected issue as I faced multiple issue myself.

Never-mind, my machine as of now is an amd64 E350 based HP dm1 3210 Laptop with 4 GB ram. Its a pretty under powered PC for running GNS3 (as compared to dedicated rigs I have seen, however I can run IOU & NX-OS Titanium over it and it balances every known equation for me) but it does the job with some tweaking and the result is very satisfactory.

Coming to the point, you will be needing -
  1. A laptop/desktop
  2. Any Ubuntu flavor installed (I use backbox, its better than backtrack)
  3. ASA 8.4.x files (initrd and kernel files, if you are reading this article, I know you have them)
  4. Patience.
Step 1 -  Installing GNS3

Well this is simple, just type the commands and it will install safely. Make sure you dont have GNS3 installed previously else you might face some issues. Please note I am using compiling GNS3 for my 64 bit OS, however it should work for 32 but laptops too, make sure you choose correct version of dynamips from GNS3 website.
 rishabh@xion$cd /opt
 rishabh@xion$sudo mkdir GNS3
 rishabh@xi0n:/opt$ wget http://sourceforge.net/projects/gns-3/files/GNS3/0.8.3.1/GNS3-0.8.3.1-src.tar.gz
 rishabh@xi0n:/opt$ unzip GNS3-0.8.3.1-src.zip
 rishabh@xi0n:/opt$ sudo mv -f /GNS3-0.8.3.1-src/* /opt/GNS3
 rishabh@xi0n:/opt$ sudo chmod 777 GNS3
 rishabh@xi0n:/opt$ cd GNS3
 rishabh@xi0n:/opt/GNS3$ sudo mkdir Dynamips Images Project Cache tmp
 rishabh@xi0n:/opt/GNS3$ sudo chmod 777 Dynamips/ Images/ Project/ Cache/ tmp/
 rishabh@xi0n:/opt/GNS3/Dynamips$ cd Dynamips/
 rishabh@xi0n:/opt/GNS3/Dynamips$ http://sourceforge.net/projects/gns-3/files/Dynamips/0.2.8-RC3-community/dynamips-0.2.8-RC3-community-x86_64.bin
 rishabh@xi0n:/opt/GNS3/Dynamips$ export PATH=$PATH:/opt/GNS3/GNS3-0.8.3.1-src/
Check if its installed by opening a terminal window and running GNS3. If it went well, proceed to next step.

Step 2 - Compiling and Patching QEMU

This is the second most crucial step, do as instructed, by the time you are finished, you will be presented with a stable installation of patched Qemu. Make sure NO previous installation of Qemu in installed on your machine.
rishabh@xion:/opt/GNS3$ wget http://download.savannah.gnu.org/releases/qemu/qemu-0.11.0.tar.gz
rishabh@xion:/opt/GNS3$tar xvzf qemu-0.11.0.tar.gz
rishabh@xion:/opt/GNS3$cd qemu-0.11.0
rishabh@xion:/opt/GNS3/qemu/qemu-0.11.0$wget http://downloads.sourceforge.net/gns-3/qemu-0.11.0-olive.patch?download
rishabh@xion:/opt/GNS3/qemu/qemu-0.11.0$patch -p1 -i qemu-0.11.0-olive.patch
rishabh@xion:/opt/GNS3/qemu/qemu-0.11.0$./configure --target-list=i386_softmmu
rishabh@xion:/opt/GNS3/qemu/qemu-0.11.0$make
rishabh@xion:/opt/GNS3/qemu/qemu-0.11.0$sudo make install
Once its installed, check by running
rishabh@xi0n:/opt/GNS3/qemu/qemu-0.11.0$ which qemu
/usr/local/bin/qemu
It should display Qemu path, if not, you screwed up some where. Do it again.

Step 3 - Preliminary Configuration

In general settings of GNS3, you will find Qemuwrapper is already configured, double check Qemu & Qemu-img path here, it should be the same as mentioned in "which" command output or better if you have placed the same it in GNS3 folder

Also, Set ASA options as
 Qemu Options:
 -vnc none -vga none -m 1024 -icount auto -hdachs 980,16,32
 Kernel cmd line:
 -append ide_generic.probe_mask=0x01 ide_core.chs=0.0:980,16,32 auto nousb console=ttyS0,9600 bigphysarea=65536
Browse to the initrd & kernel images of ASA and set memory to 1024, once done, save it.

make sure your configuration looks like this


When done, its execution time follks :)

Step 4 - Running it.

Well..it will look like this.


You can also check the ps output of Qemu (quick and dirty output here..nothing flashy)
rishabh@xi0n:/opt/GNS3$ ps ax | grep 'qemu'
 7094 pts/0    Sl+    0:00 /usr/bin/python /opt/GNS3/GNS3-0.8.3.1-src/qemuwrapper/qemuwrapper.py --listen 127.0.0.1 --port 10525 --no-path-check
 7101 pts/0    SN+    0:00 /bin/sh -c /usr/local/bin/qemu -name ASA1 -m 1024 -hda "/tmp/ASA1/FLASH" -kernel "/home/rishabh/Documents/asa842-vmlinuz" -initrd "/home/rishabh/Documents/asa842-initrd" -append "-append ide_generic.probe_mask=0x01 ide_core.chs=0.0:980,16,32 auto nousb console=ttyS0,9600 bigphysarea=65536" -net nic,vlan=0,macaddr=00:00:ab:40:a4:00,model=e1000 -net nic,vlan=1,macaddr=00:00:ab:8d:12:01,model=e1000 -net nic,vlan=2,macaddr=00:00:ab:f0:c0:02,model=e1000 -serial telnet:127.0.0.1:3001,server,nowait -vnc none -vga none -m 1024 -icount auto -hdachs 980,16,32
 7102 pts/0    R+     0:19 /usr/local/bin/qemu -name ASA1 -m 1024 -hda /tmp/ASA1/FLASH -kernel /home/rishabh/Documents/asa842-vmlinuz -initrd /home/rishabh/Documents/asa842-initrd -append -append ide_generic.probe_mask=0x01 ide_core.chs=0.0:980,16,32 auto nousb console=ttyS0,9600 bigphysarea=65536 -net nic,vlan=0,macaddr=00:00:ab:40:a4:00,model=e1000 -net nic,vlan=1,macaddr=00:00:ab:8d:12:01,model=e1000 -net nic,vlan=2,macaddr=00:00:ab:f0:c0:02,model=e1000 -serial telnet:127.0.0.1:3001,server,nowait -vnc none -vga none -m 1024 -icount auto -hdachs 980,16,32
 7175 pts/1    S+     0:00 grep --color=auto qemu
Once you are up and running, its time to grab a can of redbull (or beer if you prefer) and get a pat on your back, good work soldier :)

Miscellaneous Errors , which you *just might* encounter and how to deal with them.

If you followed my steps, I dont think you will encounter any errors, but for the sake of completeness, I am including the most basic errors which you might get.

"qemuwrapper path doesn't exist"
This one is a classic one. With proper GNS3 0.8.3x installation, you will *not* encounter it. If you are running classic 0.7.x build, God save you. Even if you have 0.8.3.x & still get this error , find Qemuwrapper (it will be there in one of GNS3 source folders) and select it, save it. Error gone. Make sure permissions are correct.

 "203-Bad number of parameters (5 with min/max=6/6)"
 Upgrade your GNS from 0.7x.x to 0.8.3, if you are following this guide, you should not get this error.

 "You are running an old and unpatched version of qemu"
Now here things get interesting. In one case I installed Qemu before installing GNS3 and I got this error quite frequently. I uninstalled Qemu, cleared my /tmp & I then first installed GNS3 and then installed Qemu after configuring GNS3 fully (except the Qemu part that is) . Did a sudo make install for Qemu and restarted my laptop. Please note I am using Qemu 0.11
Ran GNS3 and tada..


This error will be rectified.

 "You must use 'manual mode' to connect a link with a xyz module"
 Simple as hell, use manual mode..duh..

 "QEMU boots but no ASA boot output on console"
 Use correct QEMU binary, no Qemu_i386 / Qemu_x86_64. Use only correctly patched Qemu 0.11 binary in GNS3 like previously specified.

In all cases, all errors are either will be some permutation or combination of the mentioned ones. Well , it summarizes my post on running ASA, hope it will help you.

Rishabh Dangwal

EIGRP Cheatsheet – EIGRP in 15 min

EIGRP Cheatsheet – EIGRP in 15 min

Long time folks, was busy with a lot of projects. Hope coming year gets less busier and I get to get my hands more dirty on networks and network security. In the meantime, here is an EIGRP cheat sheet which I thought will be helpful to folks who just want a quick theory review of Cisco’s EIGRP. Though I wanted to cover a lot more in cheat sheet like EIGRP technologies, planning but it would have defeated the purpose of cheatsheet. Never mind, I am preparing a more comprehensive EIGRP guide which I might publish soon depending on the feedback received. In the meantime, You can find the cheatsheet at Slideshare and Scribd.


Understanding DDOS Mitigation

Understanding DDOS Mitigation
Hi all,
Its been a long time since I have posted anything, sorry for the same. I hope you will be following my twitter feed/ facebook for updates of what I have been doing nowadays, if not, no problemo , I know we will still get along well. This time I will be covering DDOS mitigation methodologies which might come handy to you in long term. I actually though of hosting a free for all DDOS server for testing , but then, it didnt materialized well and I am sharing a concised view of my part which I covered . Please be noted I am only sharing what can be made public ;) 

How to Play Devil May Cry 3 SE (dmc3 se) on PC with normal controller with xpadder

Well..its been a long time I am writing a gaming article, I actually got bored of playing with routers and thought to give myself a break and return to hack and slash genre. I picked up Devil May Cry 3 Special Edition (dmc3se) for my laptop, and the game is a poor port by Sourcenext which are equal culprits in porting Onimusha 3, Resident Evil 4 on PC on behalf of Capcom , its a pity that Ubisoft (which marketed the game for PC) and Capcom wasted such a brilliant opportunity for catering PC gamers. The issues which are faced by game are -

  • Worst control scheme ever devised, controls by which only monkeys can play
  • Poor graphics and shadow effects
  • Bad joystick detection.
  • Even Worse analog stick detection and camera issues.
  • Choppy music.

If you are reading it, I guess you have already felt the pain and googled it a lot. Well, fear not , I will counter them one all : ] just read on.

Let me divide the problem into 2 categories – control issues and other issues. Well..I divided it into these two because the solution will address them in the following manner. First, Install the game properly, choose the correct directory (or whatever you want) insert correct serial key, make sure its a clean install.

Install dmc3se properly

Once you have done that, head on to Ubisoft  and download the latest 1.3 patch for your respective version. Its absolutely critical to download and install this patch for solving the issues.

download correct patch for dmc3se and install it

Once done, open the patch and install it. Your Music, graphical issues shall be solved as of now.

Solving Controller Issues

With 1.3 patch, you will be getting a utility GPadCfg.exe at your game directory for configuring gamepad. Open it and click on edit, click on the buttons in the picture and press respective button on gamepad.

open gpadcfg and configure your controller for dmc3se

Once done, DOUBLE CLICK on save button to save the config.  Dont click on L<->R REVERSE button.

once done, DOUBLE CLICK click on save

Now, your controller is mapped to game. Now go to game directory and open DMC3SE.ini . Make sure to make a backup of it though. GO to end of DMC3SE.ini and look for the section for your gamepad config. It will look like this.

Open DMC3SE.ini

Now, edit it, such that L3 and R3 (the analog buttons) are cleared.

Edit DMC3SE.ini L3 and R3

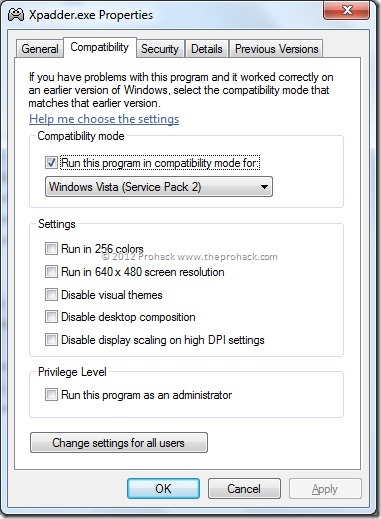
Now , download xpadder 5.3 from here . Once downloaded, open it . In case , you are using Windows 7 and it doesnt opens, right click on Xpadder.exe, go to compatibility and run it in Windows Vista SP2 mode.

change compatibility for xpadder

Also, go to folder where DMC3SE is installed, and give full permissions to the user.

give full permissions

Now open xpadder.exe, make sure your controller is connected to your PC/Laptop.  Click on controller icon to create a new profile.

configure xpadder

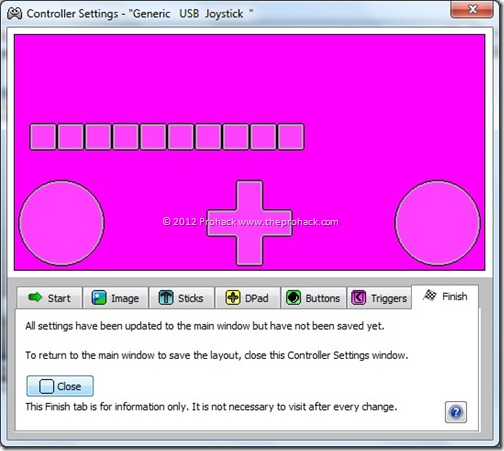
Go to stickds/button/dpad tab and enable and press the respective buttons.

configure xpadder for your gamepad

Once done, go to finish tab and click on close.

close and save

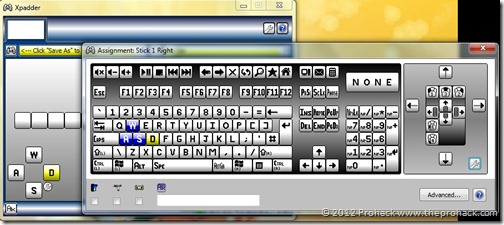
Once done, click on the buttons on the interface and map the LEFT ANALOG to W, A, S , D keys on the keyboard .

map to keyboard

Your final xpadder configuration will look like this.

final xpadder configuration

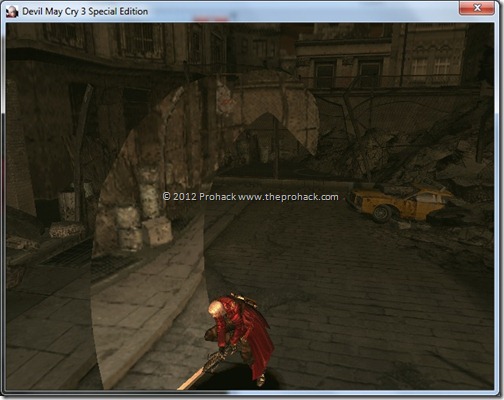
Save it. Now open the game and enjoy : ] , your controller will work fine.

play the game dmc3se

play the game dmc3se easily

I hope you will enjoy the game as much as I am enjoying it : ]

IP Subnetting – The easy way

Is network subnetting driving you crazy ? Does binary math gives you headaches ? well..fear not, since the time i have delved into networks, i have gone through all the oohs and aaahs and the NAH’s of the logical crescendo , and I present you the easiest way to do subnetting. Generally,3 questions are being addressed when subnetting an IP- IP subnetting made easy - prohack

  1. No of subnets
  2. No of valid hosts and
  3. Host range/block size

We will tackle them one by one. First you need to know about IP addresses and their classes.

Class A includes 0-127 where 0 and 127 are reserved, the default subnet mask for this class is /8 .

Class B includes 128-191 in their first octet, and the default subnet mask for this class is /16

Class C deals with 192-224 in their first octet and the default subnet mask for this class is /24

Also, also, understand a simple concept, subnet masks lying between 8- 15 are A class masks, from 16- 23 are B class and 24-32 are C class masks. Furthermore, a subnet mask can be expressed as this where (N)etwork value and (H)ost values-

Class A : 255.0.0.0   = NNNNNNNN.HHHHHHHH.HHHHHHHH.HHHHHHHH  
Class B : 255.255.0.0 = NNNNNNNN.NNNNNNNN.HHHHHHHH.HHHHHHHH 
Class C : 255.255.0.0 = NNNNNNNN.NNNNNNNN.NNNNNNNN.HHHHHHHH
Class mask value          8        16        24        32

Now once you see it, lets tackle some real life questions. Lets find the no of subnets and valid hosts for 192.168.10.10/18

See this ? its a C class IP address having a mask of B class (as the mask lies between 16-24) now, in order to find the number of subnets, use the following formulae - 

2 ^ (What mask you have been provided – default mask of the IP address given)

putting the values here..

2^(18-16) –>  2^(2) –>  4 subnets

simple : )

Now for calculating the no.of hosts, use the below formulae -

2^(32- what mask you have been provided) –2

Putting values here..

2^(32-18)-2 -> 2^(14)-2 –> 16384-2 –> 16382 hosts

piece of cake ..

now to find the block size, see the provided mask lies between which next default mask value , which in this case is 24 (as 18 is greater than 16 and less than 24) . So ..

Subtract the provided mask with the class mask value which is greater than it.

2^(Next class mask value – provided mask)

which on putting values will be

2^(24-18) –> 2^6 –> 64

So, the block size will be of 64 . So, the IP addresses will be divided into 4 subnets (which we already calculated above) above as -

192.168.0.0 - 192.168.63.255

192.168.64.0 – 192.168.127.255

192.168.128.0 - 192.168.191.255

192.168.192.0 – 192.168.255.255

And the best part, its applicable to all classes : )


Happy Subnetting : ]

GNS 3 Tutorial - configuring Static VRRP over Cisco router and testing it

Hi all,
I was working over 7200 routers for HSRP and VRRP implementation, and thought why not to cover an article over it. I will be covering Static VRRP over Cisco routers in GNS3 and will be showing you how to test it. you can also read my basic GNS3 tutorial over Cisco routers if you wish

GNS 3 Tutorial – Basic Router password Configuration

A bit about VRRP from Cisco Documentation.
The Virtual Router Redundancy Protocol (VRRP) is an election protocol that dynamically assigns responsibility for one or more virtual routers to the VRRP routers on a LAN, allowing several routers on a multiaccess link to utilize the same virtual IP address. A VRRP router is configured to run the VRRP protocol in conjunction with one or more other routers attached to a LAN. In a VRRP configuration, one router is elected as the virtual router master, with the other routers acting as backups in case the virtual router master fails.
In layman's terms, it allows for switching of routers in case a link fails or flaps. I have left some advanced parts from this tutorial, this is completely for those who have a general idea of Cisco CLI and want to learn how to configure fault tolerant VRRP over cisco routers.

Here is the GNS3 topology I will be using for this tutorial


Now, fire up your GNS3 and start by configuring all the routers. Click on the console button over titlebar to start putty terminal.the first step is to configure telnet over routers R3.

(PS: I have kept the passwords simple for the sake of simplicity, don't try this habit in an actual scenario.)

Router R3
Router>en
Router#conf t
Enter configuration commands, one per line.  End with CNTL/Z.
Router(config)#line vty 0
Router(config-line)#password r3
Router(config-line)#login
Router(config-line)#exit
Once done, Lets configure the R3 router and assign IP address over it.
Router(config)#int s0/0
Router(config-if)#ip add
Router(config-if)#ip address 1.1.1.1 255.255.255.252
Router(config-if)#no sh
Router(config)#int s0/1
Router(config-if)#ip address 2.1.1.1 255.255.255.252
Router(config-if)#no sh
Router(config-if)#
Router(config-if)#exit
Router(config)#
So far, router R3 has been configured. Do the same for all others. make sure to assign R4 and R5 same lan IP.

Router R4
Router>en
Router#conf t
Enter configuration commands, one per line.  End with CNTL/Z.
Router(config)#line vty 0
Router(config-line)#password r4
Router(config-line)#login
Router(config-line)#exit
 and Interface IP's
Router(config)#int s0/0
Router(config-if)#ip add
Router(config-if)#ip address 1.1.1.1 255.255.255.252
Router(config-if)#no sh
Router(config)#int e1/0
Router(config-if)#ip address 192.168.1.1 255.255.255.0
Router(config-if)#no sh
Router(config-if)#
Router(config-if)#exit
Router(config)#
Router R5
Router>en
Router#conf t
Enter configuration commands, one per line.  End with CNTL/Z.
Router(config)#line vty 0
Router(config-line)#password r5
Router(config-line)#login
Router(config-line)#exit
 and Interface IP's
Router(config)#int s0/0
Router(config-if)#ip add
Router(config-if)#ip address 1.1.1.1 255.255.255.252
Router(config-if)#no sh
Router(config)#int e1/0
Router(config-if)#ip address 192.168.1.2 255.255.255.0
Router(config-if)#no sh
Router(config-if)#
Router(config-if)#exit
Router(config)#
Once done, its time to add some routes to the routers. After doing it, Ping everything to every lan/wan just to be safe and sure.

Router R3

Router(config)#ip route 192.168.1.0 255.255.255.0 1.1.1.2
Router(config)#ip route 192.168.1.0 255.255.255.0 2.1.1.2 20
Router R4
Router(config)#ip route 2.1.1.0 255.255.255.0 192.168.1.2 20
Router(config)#ip route 2.1.1.0 255.255.255.0 1.1.1.1
Router R5
Router(config)#ip route 1.1.1.0 255.255.255.0 2.1.1.1 20
Router(config)#ip route 1.1.1.0 255.255.255.0 192.168.1.1
If it doesnt pings, then you might have screwed up some where.
Run "sh ip route" over router to check configuration. 

Router 3
Router#show ip route
Codes: C - connected, S - static, R - RIP, M - mobile, B - BGP
       D - EIGRP, EX - EIGRP external, O - OSPF, IA - OSPF inter area
       N1 - OSPF NSSA external type 1, N2 - OSPF NSSA external type 2
       E1 - OSPF external type 1, E2 - OSPF external type 2
       i - IS-IS, su - IS-IS summary, L1 - IS-IS level-1, L2 - IS-IS level-2
       ia - IS-IS inter area, * - candidate default, U - per-user static route
       o - ODR, P - periodic downloaded static route
Gateway of last resort is not set
     1.0.0.0/30 is subnetted, 1 subnets
C       1.1.1.0 is directly connected, Serial0/0
     2.0.0.0/30 is subnetted, 1 subnets
C       2.1.1.0 is directly connected, Serial0/1
S    192.168.1.0/24 [1/0] via 1.1.1.2
Router R4 
Router#sh ip route
Codes: C - connected, S - static, R - RIP, M - mobile, B - BGP
       D - EIGRP, EX - EIGRP external, O - OSPF, IA - OSPF inter area
       N1 - OSPF NSSA external type 1, N2 - OSPF NSSA external type 2
       E1 - OSPF external type 1, E2 - OSPF external type 2
       i - IS-IS, su - IS-IS summary, L1 - IS-IS level-1, L2 - IS-IS level-2
       ia - IS-IS inter area, * - candidate default, U - per-user static route
       o - ODR, P - periodic downloaded static route
Gateway of last resort is not set
     1.0.0.0/30 is subnetted, 1 subnets
C       1.1.1.0 is directly connected, Serial0/0
     2.0.0.0/24 is subnetted, 1 subnets
S       2.1.1.0 [1/0] via 192.168.1.2
                [1/0] via 1.1.1.1
C    192.168.1.0/24 is directly connected, Ethernet1/0
Router R5
Router#sh ip route
Codes: C - connected, S - static, R - RIP, M - mobile, B - BGP
       D - EIGRP, EX - EIGRP external, O - OSPF, IA - OSPF inter area
       N1 - OSPF NSSA external type 1, N2 - OSPF NSSA external type 2
       E1 - OSPF external type 1, E2 - OSPF external type 2
       i - IS-IS, su - IS-IS summary, L1 - IS-IS level-1, L2 - IS-IS level-2
       ia - IS-IS inter area, * - candidate default, U - per-user static route
       o - ODR, P - periodic downloaded static route
Gateway of last resort is not set
     1.0.0.0/24 is subnetted, 1 subnets
S       1.1.1.0 [1/0] via 192.168.1.1
     2.0.0.0/30 is subnetted, 1 subnets
C       2.1.1.0 is directly connected, Serial0/0
C    192.168.1.0/24 is directly connected, Ethernet1/0

Till here, basic configuration has been done. now we will configure VRRP over R4 on ethernet interface.

Now in very very simple terms, 

  1. We will be tracking an interface (by giving it a track id) which in case if goes down the router shall switch states, in this case its the serial link from Router R3 to R4 (serial 0/0)
  2. We will be creating a group of routers (here R4 and R5), 
  3. Assign a group ID to them (which is "1" btw) , 
  4. After that, we will create a Virtual gateway over both routers which will be always up in case any router goes down (and thats why we gave both routers IP's from same lan) .
  5. Then will select one of them as Master router and Rackup router (R4 in this case and R5 as Backup) and assign priority to them (higher is important, default is 100, 200 to R4, default to R5). 
  6. We will specify a decreasing value which shall be subtracted from priority which will preempt it to switch to router with higher priority, which in this case is 110. As serial link from R3 to R4 fails, 110 will be subtracted from 200 and hence R5 will have a higher priority 100 > then priority of R4 which is 90, hence it will become the Master router.
  7. Test it :)


Router R4
Assign track id to Serial interface, which will be monitored by R4 .
Router(config)#track 1 interface serial 0/0 line-protocol
Router(config-track)#exit
Then configuring VRRP over it.
Router(config)#int e1/0
Router(config-if)#vrrp 1 ip 192.168.1.3
Router(config-if)#vrrp 1 priority 200
Router(config-if)#vrrp 1 preempt
Router(config-if)#vrrp 1 track 1 decrement 110
Router(config-if)#exit
Hence the final configuration upon "sh vrrp" will be
Ethernet1/0 - Group 1
  State is Master
  Virtual IP address is 192.168.1.3
  Virtual MAC address is 0000.5e00.0101
  Advertisement interval is 1.000 sec
  Preemption enabled
  Priority is 200
    Track object 1 state Up decrement 110
  Master Router is 192.168.1.1 (local), priority is 200
  Master Advertisement interval is 1.000 sec
  Master Down interval is 3.218 sec
Now we need to configure VRRP over Router 5

Router 5
Not much to do here except to enable preempt and VRRP..
Router(config)#int e1/0
Router(config-if)#vrrp 1 ip 192.168.1.3
Router(config-if)#vrrp 1 preempt
Router(config-if)#exit
hence final configuration of Router 5 will be 
Ethernet1/0 - Group 1
  State is Backup
  Virtual IP address is 192.168.1.3
  Virtual MAC address is 0000.5e00.0101
  Advertisement interval is 1.000 sec
  Preemption enabled
  Priority is 100
  Master Router is 192.168.1.1, priority is 200
  Master Advertisement interval is 1.000 sec
  Master Down interval is 3.609 sec (expires in 3.201 sec)
Congrats :) you have configured VRRP over your routers. Now to check , if its working or not, first traceroute your packet to 192.168.1.0 lan from Router R3
Router#traceroute 192.168.1.1
Type escape sequence to abort.
Tracing the route to 192.168.1.1
1 1.1.1.2 56 msec 88 msec *
Its going through our primary router :) now telnet from Router R3 to virtual gateway.
Router#telnet 192.168.1.3
Trying 192.168.1.3 ... Open

User Access Verification
Password:
Router>

If the password which gives you access is r4, then its configured correctly as of now. Now , lets shut unshut the primary serial interface from Router R3 .

Router#
Router#conf t
Enter configuration commands, one per line.  End with CNTL/Z.
Router(config)#int s0/0
Router(config-if)#sh
Router(config-if)#exit
Router(config)#
*Mar  1 00:57:27.927: %LINK-5-CHANGED: Interface Serial0/0, changed state to administratively down
*Mar  1 00:57:28.927: %LINEPROTO-5-UPDOWN: Line protocol on Interface Serial0/0, changed state to down
Router(config)#exit
Router#
*Mar  1 00:57:38.483: %SYS-5-CONFIG_I: Configured from console by console
Router#
Good, now ping virtual gateway
Router#ping 192.168.1.3
Type escape sequence to abort.
Sending 5, 100-byte ICMP Echos to 192.168.1.3, timeout is 2 seconds:
!!!!!
Success rate is 100 percent (5/5), round-trip min/avg/max = 20/49/80 ms
its working fine, now traceroute the packet to 192.168.1.0 lan from Router R3
Router#traceroute 192.168.1.1
Type escape sequence to abort.
Tracing the route to 192.168.1.1
  1 2.1.1.2 64 msec 68 msec 64 msec
  2 192.168.1.1 44 msec 68 msec *
:)) its working too..now finally we login into virtual gateway from Router R3 and i assume we will login into Router R5, and then lets check out the VRRP configuration by running "sh vrrp" command.
Router#
Router#telnet 192.168.1.3
Trying 192.168.1.3 ... Open

User Access Verification
Password:
Router>sh vrrp
Ethernet1/0 - Group 1
  State is Master
  Virtual IP address is 192.168.1.3
  Virtual MAC address is 0000.5e00.0101
  Advertisement interval is 1.000 sec
  Preemption enabled
  Priority is 100
  Master Router is 192.168.1.2 (local), priority is 100
  Master Advertisement interval is 1.000 sec
  Master Down interval is 3.609 sec
which works :) as Router R5 is the Master Router for now. Now disconnect from Router R5 and unshut the serial interface from Router R3, login into virtual gateway again and then check out the VRRP configuration by running "sh vrrp" command.
Router#exit
[Connection to 192.168.1.3 closed by foreign host]
Router#conf t
Enter configuration commands, one per line.  End with CNTL/Z.
Router(config)#int s0/0
Router(config-if)#no sh
Router(config-if)#exit
Router(config)#
*Mar  1 01:08:41.739: %LINK-3-UPDOWN: Interface Serial0/0, changed state to up
*Mar  1 01:08:42.743: %LINEPROTO-5-UPDOWN: Line protocol on Interface Serial0/0, changed state to upexit
Router#
*Mar  1 01:08:46.955: %SYS-5-CONFIG_I: Configured from console by console
Router#telnet 192.168.1.3
Trying 192.168.1.3 ... Open

User Access Verification
Password:
Router>sh vrrp
Ethernet1/0 - Group 1
  State is Master
  Virtual IP address is 192.168.1.3
  Virtual MAC address is 0000.5e00.0101
  Advertisement interval is 1.000 sec
  Preemption enabled
  Priority is 200
    Track object 1 state Up decrement 110
  Master Router is 192.168.1.1 (local), priority is 200
  Master Advertisement interval is 1.000 sec
  Master Down interval is 3.218 sec
Router>
Excellent..VRRP has been fully configured as the Router R4 is again the Master Router :) 
Congrats..you have successfully configured the VRRP over Static on Cisco Routers and fully tested it for fault tolerance .

till then

Stay Gold :))